EDBMS Admin App (0.1.8)
The explains the core functionality and usage of the primary application for admin users to load table data and lab assays, perform qaqc and spatially export data.
Note
Login
To log in, enter your username and password to generate a login token.
The “Forget me” button clears this token.
Logout
You can log out by clicking either the “Logout” button or the “X” in the top-right corner.
Logging out with “X” will keep the login token, allowing for automatic login next time.
Home Page
Click on the primary logo to return to the home page.
Navigation
The app home page allows navigation of the database schema tables and the relationships.
Ensuring that the database model can be easily understood by experienced database administrators as well as geologists with limited database management experience is core to the philosophy of the dmsEDBMS.
This can be useful to quickly investigate and understand relationships between tables within the schema in a visual way. Pan and select are toggled on a off and you can reset the view.
You can also search for table by name, the app will jump to the table, and the table column names, column types, primary and foreign keys are shown. Clicking on a table will highlight the links to the related tables, and the related tables of those tables.

Table CRUD operations
CRUD (Create, Retrieve, Update and Delete) operations can also be performed on tables from the home page.
Add or edit individual records, useful to quickly add or edit a specific lookup or corp code.

Warning
The database schema is setup to have ‘on update cascade’ for many lookup and other related records.
Note
By default the database schema is setup NOT to have any cascades for ‘on delete’ operations. So attempting to delete related records will not be permitted.
Export tables as csv templates
A single click Export Template ZIP will dump empty CSV versions of all database tables.

Single table export
Once a single table is selected and shown in the lower panel, it can be exported.
Single table import
Once a single table is selected then that single table can be imported, unlike the Import CSV Wizard this will validate assuming that the column names are the same in the template as the database.
Multi table import
The button Import CSV Wizard will open a new window where multiple tables can be imported at once.
The wizard will guide the user through the process of matching the provided CSV tables in the folder selected to the tables in the database, likewise the columns, the import mode can be changed to overwrite data with primary key constraints. Finally the data will be validated to ensure it can be loaded without issue and then it will be saved to the database.
Note
For easy loading, the order in which the files need are loaded into the database will be managed by application. So if surveys, collars and samples are loaded, then the system will load the collars first before the samples.
Warning
To load batches of related data they should be placed in a single folder. Related collar, surveys etc…
Multi table export
The button Export CSV ZIP will dump out the entire database as CSV files. This can be used to create full database backups.
Warning
This process may take several minutes to complete, depending on the size of the database tables.
Assay Loading
Prior to attempting to load assays settings for reading the lab SIF files must be correctly set up.
Attention
Make sure all drillhole and sampling information is loaded into the database before loading assay data.
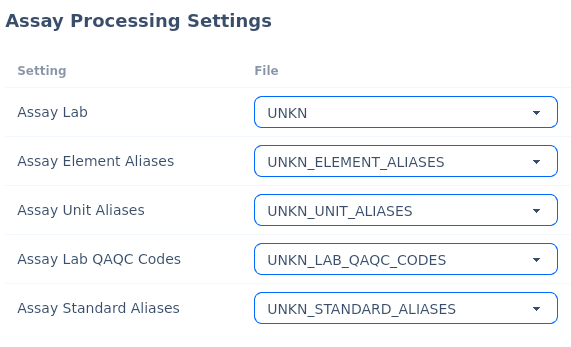
Assay Processing Settings
Within the config tab there are settings for the older where the assay configuration files should be located.
Four files need to exist for each assay lab template version, as defined below:
File |
Use |
|---|---|
Assay Lab |
Defines the core rows and columns to map components from the SIF file. |
Assay Element Aliases |
Defines aliases to parse on elements, so database elements are consistent. |
Assay Unit Aliases |
Defines aliases to parse on units, so database units are consistent. |
Assay Lab QAQC Codes |
Defines how to strip out lab qaqc samples from the SIF file. |
Assay Standard Aliases |
Defines aliases to parse on standard names, so database standard names are consistent. |
Note
See the default example versions provided, for the exact syntax these files follow. They are simply plain text files in JSON format.
Assay Lab
{
    "ASSAY_LAB": "ALS",
    "NUMBER_SAMPLES": [3, 2],
    "DATE_RECEIVED": [4, 2],
    "DATE_COMPLETED": [5, 2],
    "LAB_METHOD_ROW": 10,
    "ELEMENTS_ROW": 11,
    "UNITS_ROW": 12,
    "LOWER_DETECTION_ROW": null,
    "UPPER_DETECTION_ROW": null,
    "DATA_START_ROW": 13,
    "DATE_FORMAT": "%Y-%m-%d"
}
Note
The square braces define [row, column] for the item.
Note
Use ‘null’ if lower detection limits are not provided. Regardless, these are actually separately maintained in assay_lab_analysis_properties.
Note
For DATE_FORMAT, you can set accordingly your format.
“%Y-%m-%d” // YYYY-MM-DD
“%d/%m/%Y” // DD/MM/YYYY
“%m-%d-%Y” // MM-DD-YYYY
“%d-%m-%Y” // DD-MM-YYYY
See Setting Date Format for more details.
Assay Element Aliases
 {
    "WT_Fraction_Minus": [],
    "WT_Fraction_Plus": [],
    "Wt_MinusFracEntire": ["WT. - Frac Entire"],
    "Wt_PlusFracEntire": ["WT. + Frac Entire"],
    "Au_Plus": ["Au (+) Fraction"],
    "Au_Minus": ["Au (-) Fraction"],
    "Au_Total": ["Au Total (+)(-) Combined"],
    "Wt_Samp": ["Recvd Wt.", "WT. SAMPLE", "WT. Total"],
    "Pass75": ["Pass75um"],
    "Pass3000": ["Pass3mm"],
    "Rmnd75": ["Rmnd75um"],
    "Pass2000": ["Pass2mm"],
    "Rmnd2000": ["Rmnd2mm"]
}
Note
Elements within the square braces will be mapped to those elements in the database. This keeps variations between different labs and lab template versions consistent in the database.
Assay Unit Aliases
Assay labs sometimes use different units, the database needs to be consistent, so here we will dynamically change them on import:
{
    "PCT": ["%"]
}
Assay Lab QAQC Codes
Assay lab qaqc codes are reference with lines starting with a particular text string. These records are then flagged as lab qaqc samples and will be treated, and loaded accordingly (into the lab qaqc assay data tables). As shown multiple codes can be defined for a lab.
Warning
The standard names and lab repeat original sample names are assumed as being provided as space delimited strings.
Warning
We have pre-loaded thousands of OREAS standard meta data and they use a consistent naming convention: ‘OREAS-XXXXX’ We have noticed that labs sometimes use ‘OREAS XXXX’ these will need to be corrected - a global find and replace ‘OREAS ‘ -> ‘OREAS-’ will do this. Replacing the blank space with a dash. Assay labs are generally very helpful and will accommodate formatting requests.
The QAQC assay config file defines how to strip out the lab qaqc samples:
{
    "ASSAY_LAB": "ALS",
    "STANDARDS": ["*STD", "St"],
    "REPEATS": ["*REP", "Ch"],
    "BLANKS": ["BLANK", "Blank"]
}
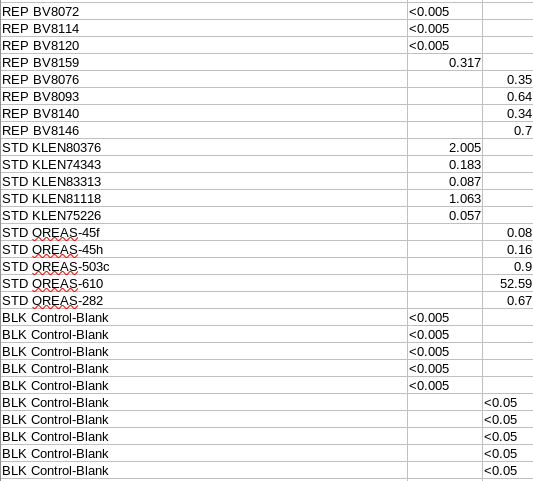
These represent the start of each line, as shown in the example below:
Notice that there is a single space between the ‘REP’, ‘STD’, ‘BLK’ The standard name, original sample name or blank control name is define as a single complete string (without spaces):
Lab QAQC load
The lab qaqc data will then be loaded into:
public.qaqc_lab_checks
In order to load the lab qaqc samples correctly they must exist in the appropriate related tables within the database.
Warning and errors will occur on loading an assay where required values and entries are missing.
Standards and Blanks
The standard/blank names must be included in:
public.assay_standards public.assay_standard_meta – standards will load without this table – however without this information no meaning interpretation of QAQC can be made.
Assay analysis properties
In order to determine the analysis limits, whether a result for a specific sample is within acceptable ranges the analysis methods metadata must be included within:
public.assay_lab_analysis_properties This relies on it’s related tables being populated !!!
Company QAQC
Company QAQC data is not loaded into its own separate table, rather it is loaded directly into:
public.sample_dh_raw_assays
The definition of what is a company QAQC sample is define in:
public.sample_dh_assays → lk_sample_check_type_code
lk_sample_check_type_code |
|---|
DUPLICATE |
PRIMARY |
NO-SAMPLE |
BLANK |
STANDARD |
Processing Assays
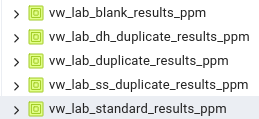
Once the assays are loaded into the primary database table as series of views are prepared for the QAQC graphical user interface to use:
These are split into company and lab views, as shown:

In order for these to represent proper comparisons between duplicates, standard etc, they must be converted into consistent units of measure, this is handled by the view creation scripts.
Finding invalid / failed batches
Currently this is not an automated process, a review of the lab batches must be performed in order to verify that the lab batch passes QAQC.
Assay Standard Aliases
Values enclosed in square brackets will be mapped to the corresponding standard names in the database.
If any aliases exist, they will appear during the Standard Names Check stage.
{
    "OREAS-100a": ["OREAS100a", "OREAS_100a"],
    "OREAS-262": ["OREAS262"]
}

Assay Loading Procedure
The assay loading procedure is designed to be as efficient as possible.
Several steps will be undertaken
First select the correct assay lab configuration.
The selection is based on the available configurations as defined in the config settings of the app. See Config settings for more details.
Select a folder containing the assay files you want to import.
Note
The folder should contain assays in the same format (as per the assay lab settings for the import)
Start the check assays procedure.
The follow steps are undertaken:
Note
The assay batch name is the name of the assay file.
Check stage |
Specifics |
|---|---|
Batches |
Assay batches are present and not already loaded. |
Lab jobs |
Checking the assay files are parsed & necessary information is extracted |
Lab methods |
Checks the lab methods are present in the database. |
Elements |
Checks the elements are present in the database. |
Units |
Checks the units are present in the database. |
Standard names |
Checks the standard names are present and aliases in the database. |
Extra relating information |
Checks the database to ensure the related tables contain the sample info. |
Warning
The process will halt if there are things which prohibit the load. You can open the files, make fixes and save them. Then simply re-check them without starting over.
Note
There will be an option to add missing lab methods, elements and units - do this with caution, adding incorrect / repeated / unwanted codes will cause someone in the future annoyance.
Removing and reloading assay lab jobs
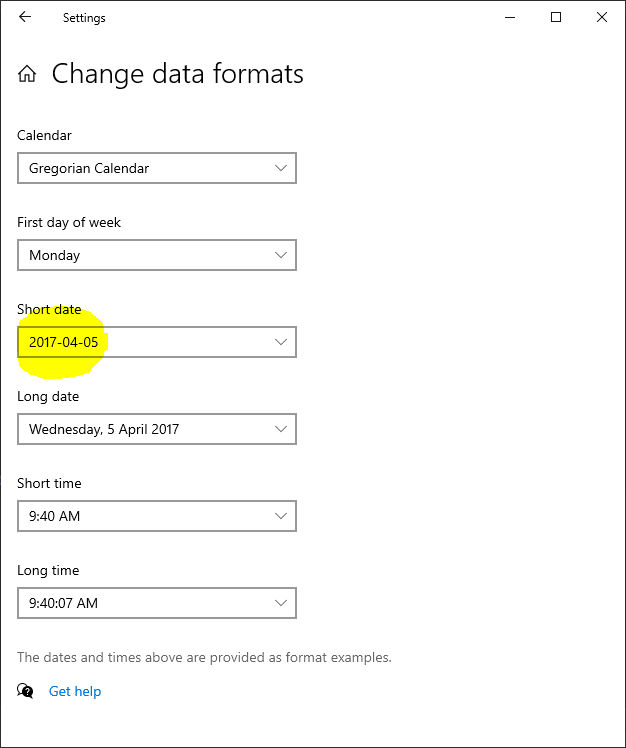
Setting Date Format
The database is configured to use YYYY-MM-DD -> 2024-12-01 -> “%Y-%m-%d” (in config) this is the advised date format to use, as it is the least ambiguous.
To set this globally on windows, go to settings -> time and language -> region:
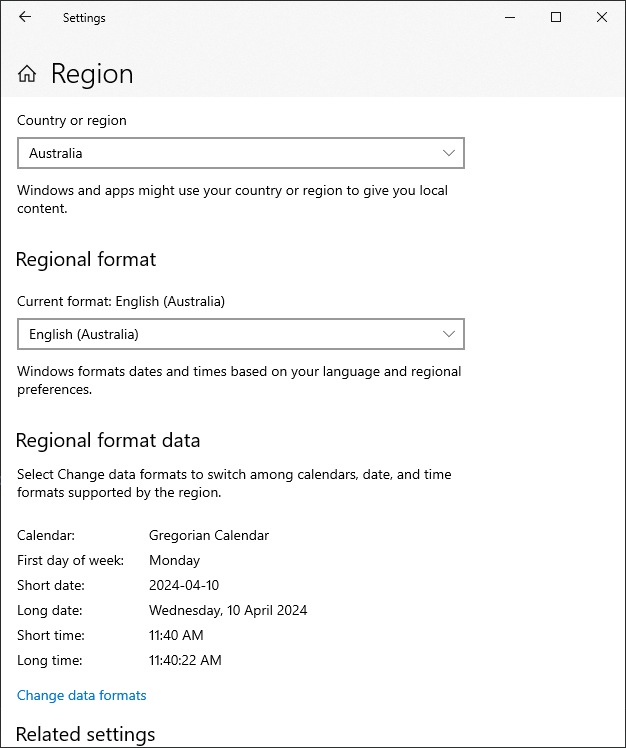
Then change the short date:
Config settings
The tab provides some core settings for the app as described below.
Batch Load Settings
This provides an option to ignore errors and continue to load, skipping over error rows. We advise to set this OFF, unless absolutely necessary.
Warning
Setting this to ON has not been thorough tested. Made need some further work to record all the transactions that are skipped over.
Query Manager Settings
To use the AI powered sql generation provide an OpenAI Key:
Batch Export Settings
This is the default folder where any exports for the app will be saved to.
Spatial Exporter

To filter data, click on the label of the polygon, then select ‘Apply Polygon Filter’.
Editing GIS layers
Query builder
AI powered human text to sql creation
Execute procedures
Adding a procedure
QAQC
The QAQC Graphing feature enables users to visualize QAQC data for both company-provided and lab-provided samples.
Data can be filtered by date ranges and lab batches, with all specified conditions required for filtering.
By default, the graph displays the first 20 samples.
Download Elements PNG button
Allows users to download the chart as a PNG image file, including data for all elements.
Note: This button becomes active only after selecting conditions such as Lab and Lab Batches.
Download PNG button
Enables users to download the chart as a PNG image file.
Download CSV button
Exports the table data as a CSV file for further analysis.
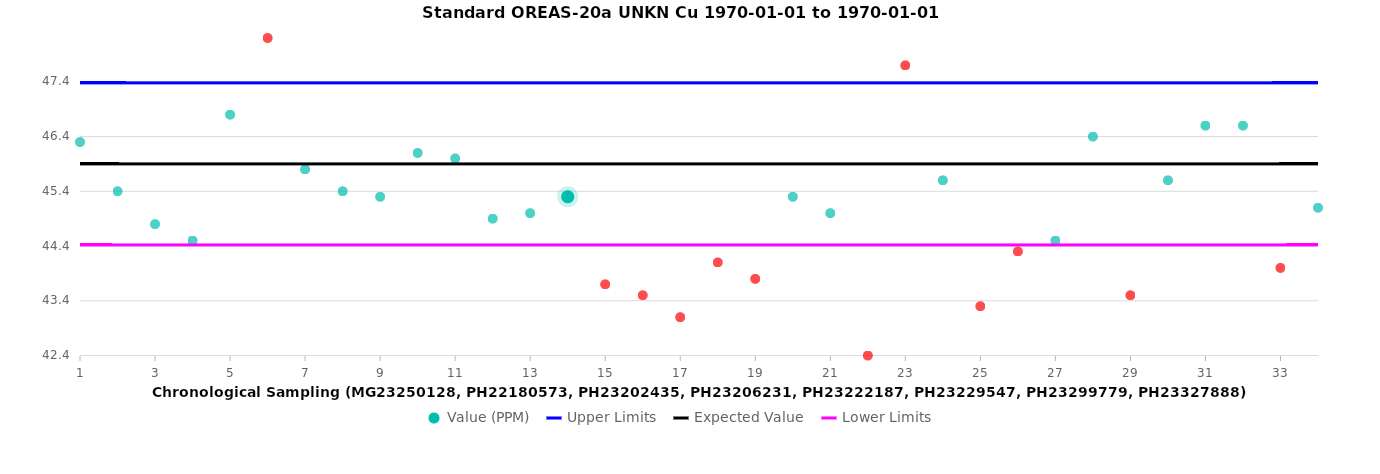
Standards
The black line represents the expected value.
The blue line indicates the upper limit, and the magenta line represents the lower limit.
Green circles denote samples within the acceptable range, while orange circles highlight samples outside the range.
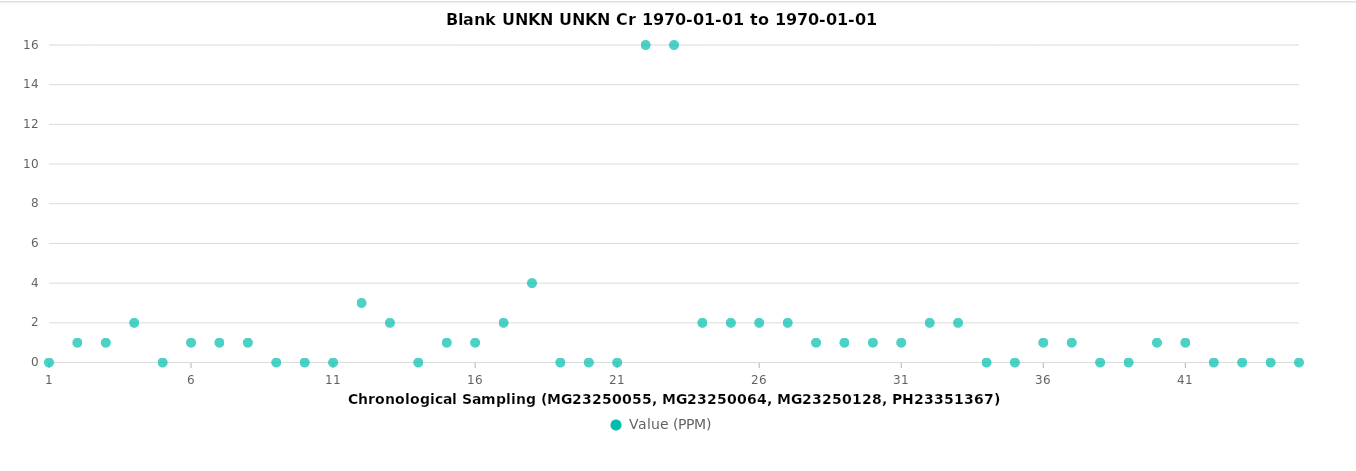
Blanks
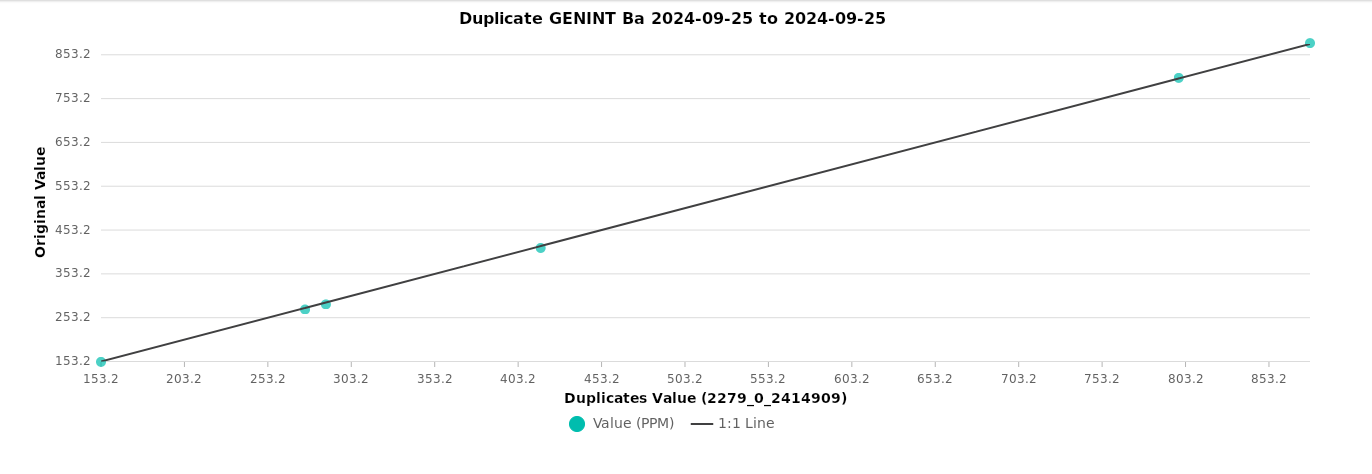
Duplicates
The black line represents the 1:1 ratio, illustrating perfect agreement between duplicate samples.
LAS Processing
This function processes LAS files into three database-ready CSV files.
It performs two main stages Validation and Processing — and then moves processed files aside.

Validation
In the Validation stage, each LAS file is parsed to confirm that it contains all four required sections:
Well
Parameter
Curve
ASCII Data
Any file missing one or more of these sections is flagged as invalid and skipped in the subsequent Processing stage.
Processing
Once files pass validation, three CSVs are produced. Below are mappings of some columns in dh_geophysics.csv and its source:
dh_collar_id From the Well section (keys: WELL, UWI, API).
survey_date From the Well section (keys: DATE, LDAT), default: 1900-01-01.
corp_company_code From the Well section (keys: COMP, COMPANY, SRVC, CTRY).
Note
Mappings are currently hard-coded; if demand increases, we’ll move them to an external config file.
Compatibility with LAS versions 1.x and 3.x is not guaranteed; this tool has only been tested with version 2.0.
Workflow Summary
Select a directory that contains LAS files.
The application will display the validation results for each file.
Click the “Process Valid Files” button to process the files.
The output CSV files (dh_geophysics.csv, dh_geophysics_las_meta.csv, and dh_geophysics_meta.csv) will be saved in a las_output folder under the directory you selected.
Note
Processed LAS files are moved to a processed folder under the selected directory.
LAS files with errors remain in the original directory.
Hover over the “invalid” status to view the error message.
This function for LAS version.2.0.
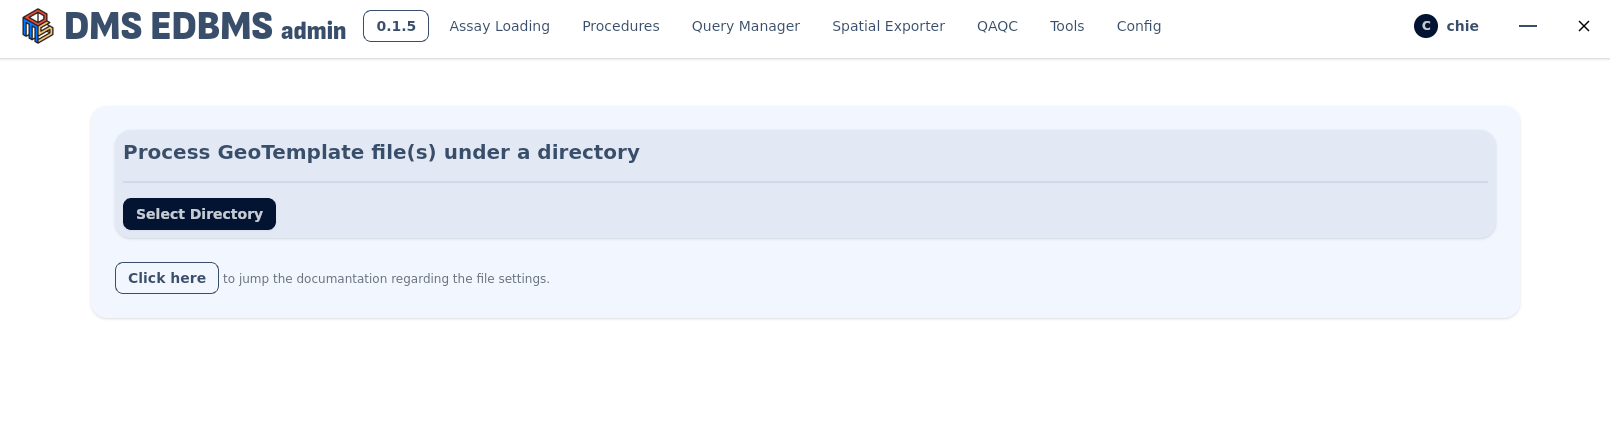
Tools
This script converts an Excel file into a pivoted CSV file specifically for lithology tables. When processing file(s), it creates a folder named after the [dh_collar_id] within the selected directory and saves all generated CSV files in that folder.
The Excel file must adhere to the naming convention: “GeoTemplate_[dh_collar_id].xlsm” (e.g., GeoTemplate_DD00000.xlsm). The script extracts the [dh_collar_id] (e.g., DD00000) from the file name by splitting it at underscores (“_”). It then uses this identifier to name the new directory under the selected path.
- requirements
The lith_lookups sheet is essential for generating lith_intervals.csv and lithologies.csv.
The columns lith_table_name and name from this sheet are used to identify a table when order is not null
Note
Sheets are ignored if their names include “action”, “saves_record”, or “Sheet”.
The “dh_lith” sheet is converted into two separate CSV files: lith_intervals.csv and lithologies.csv.
If there are multiple “dh_lith” sheets exist (ie:dh_lith_01, dh_lith_02), it generates lithologies_01.csv, lithologies_02.csv and lith_intervals.csv.
The sheets whose name contains “lithology_[XXXX]” is converted into two separate CSV files: lith_intervals_[XXXX].csv and lithologies_[XXXX].csv.
The “dh_structure” sheet is converted into two separate CSV files: lith_events.csv and litholithology_eventslogies.csv.
All other sheets are converted directly to CSV without pivoting.
Release Note
0.1.8 (2025-08-08)
LAS Processing: Added new page to convert LAS to CSV files.
Tools: Improved to display date format properly.
Tools: Added a checkbox to remove id, updated_at columns.
0.1.7 (2025-06-06)
Assay loading: Added Standard names checking after Units.
Assay loading: Added “Continue” buttons after Standard names checking.
Assay loading: Added Assay Standard Aliases in the Assay Processing Settings and set default selected option.
Main Page: Update diagram(deleted lk_assay_element_oxide_conversions, added lithologies_* tables).
0.1.6 (2024-12-03)
Updated OpenAI API key format to support the latest version.
Spatial Exporter Page: Added collar/surface sample toggle and separated the “Clear Filter” button.
Main Page: Modified CSV import to match table selection in alphabetical order.
Tools: Enabled support for exporting multiple pivot lithology files.
QAQC Page: Adjusted color for out-of-range data in the chart and enabled export of all elements as PNG files.
0.1.5 (2024-10-30)
Remove Rememberme
Spatial filtering
Pivot tool
Assay loading improvement
Query Manager error
0.1.4 (2024-10-21)
Modified selection in alphabetical order
Fixed QAQC export PNG
0.1.3 (2024-08-20)
Update database schema
0.1.2 (2024-08-06)
Remove .env file
Updator