Drill Hole Sampling and Sample Submission App (0.1.6)
The drill-hole sampling app is designed to making down-hole sampling as easy and fool proof as possible.
Application modes
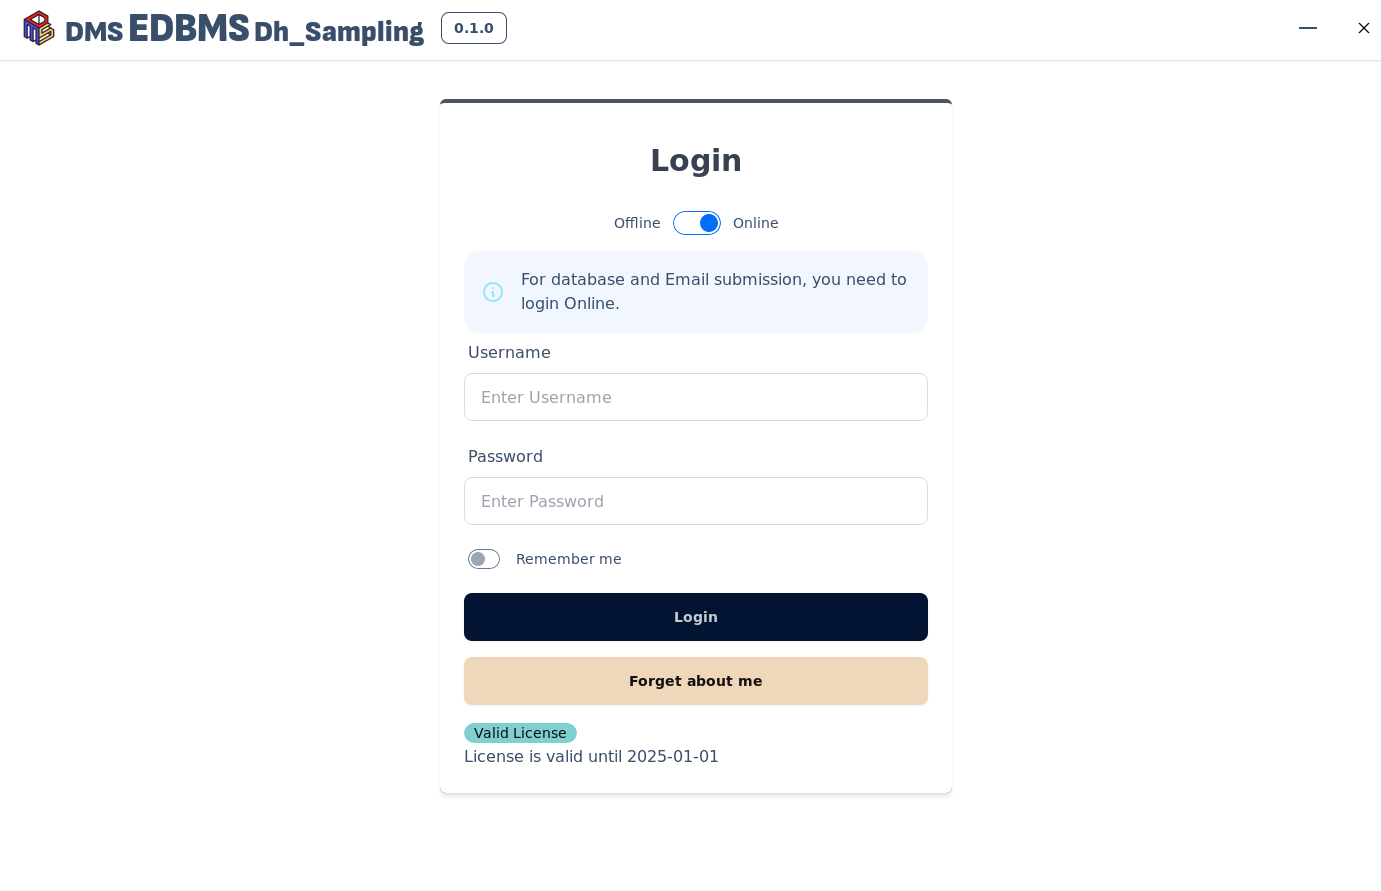
There are two modes to run the app, offline and online.
Online
In order to be able to set up the initial codes to use for the app you must be connected online. The login credentials protect the access routes to the database so logging in is essential.
Offline
Offline mode is used when collecting data is needed to be completed in a remote field setting. The data collected is saved locally onto the machine.
Once ready to send emails to the lab and office, then an internet connection is necessary and login required.
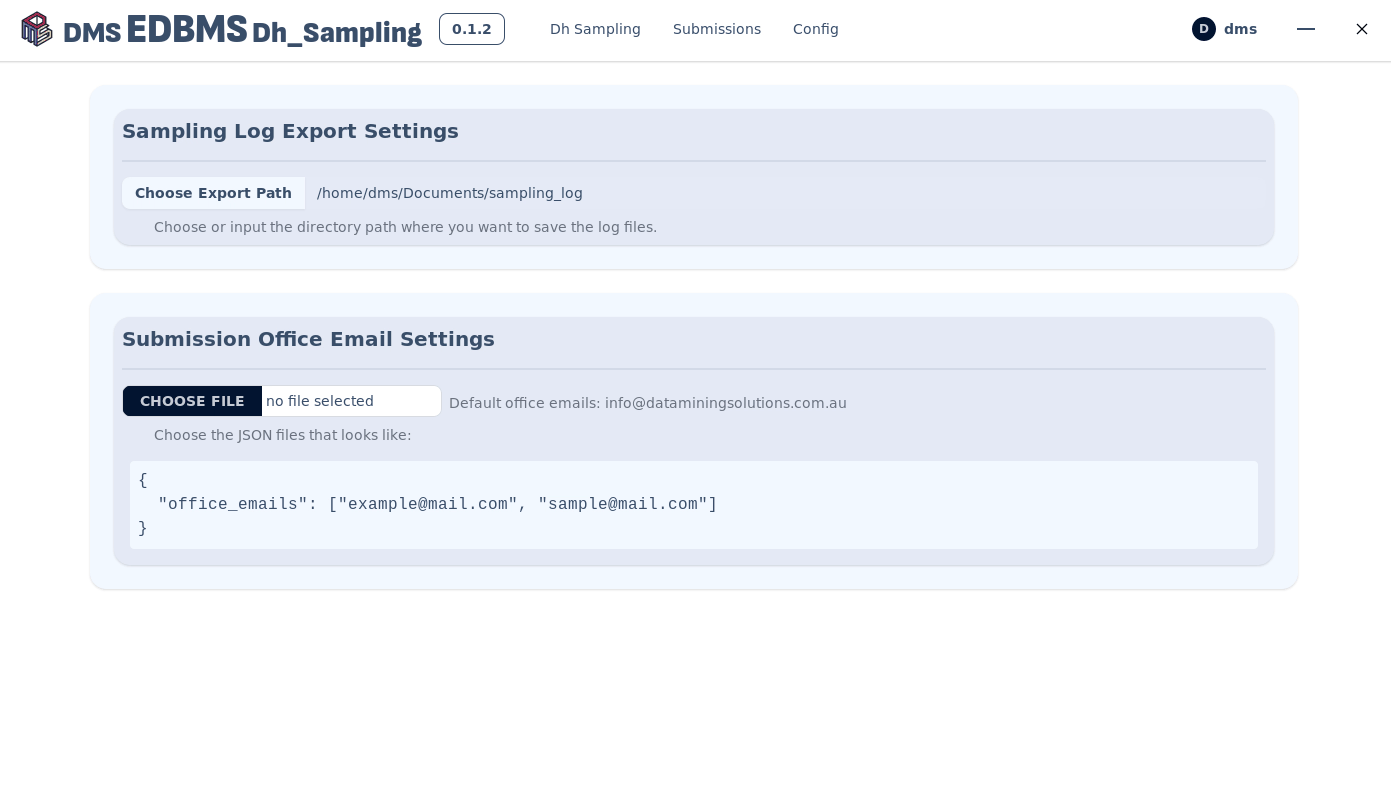
First time configuration settings (Initial setup)
The default settings for the exports are configured in the config tab.
To initialize the application, an online login is required.
App default working directory
Setting the default app working folder:
This is also the folder location which the app will save the lookups and app data.
Sub folders will be generated for different drill holes, samples and documents.

Office email recipients
Setting the office email recipients.

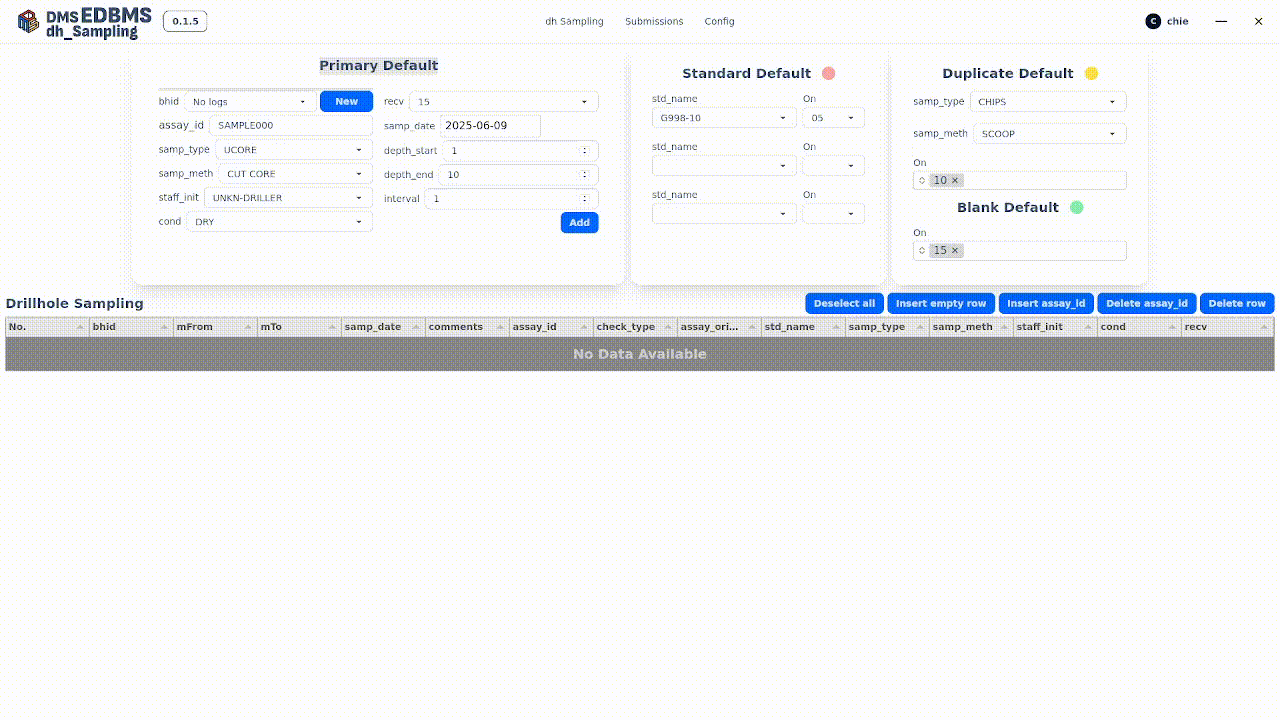
Default Standard/Duplicate/Blank Sampling Settings
Setting the default Standard / Duplicate / Blank type.

Note
When the last two digits of the assay_id match the configured setting, the sample type is automatically assigned as Standard, Duplicate, or Blank.
Lab email recipients
The lab email recipients are stored within the database. Users can, however change them if necessary.
Local lookup json files
This step ensures that both the internet connection and the database are accessible.
If either the internet or the database is not connected, the initialize button will remain disabled.
Once a connection is established and the button is clicked, the app will save local copies of the lookup tables.
These local copies will be available for the app to use when internet service is unavailable.
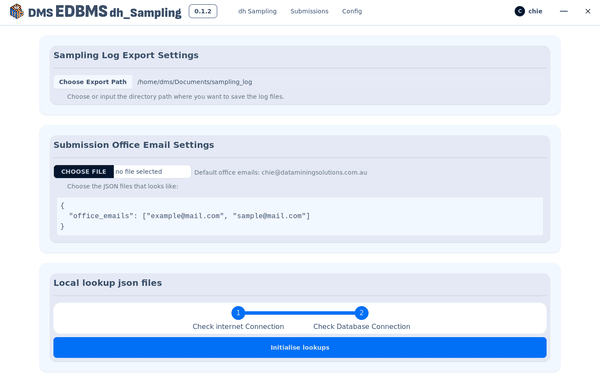
Note
It is possible to hack the lookup configuration files to add codes in an emergency situation. The files are plain json files so can be carefully edited in a text editor, to add new codes.
Home Page
When you open the home page, it automatically loads logs and retrieves the files you configured on the Config Page.
If you update the configuration and want to refresh the loaded files, simply revisit the home page.
Drill hole sampling
The following video shows the process to make a new drill-hole and create downhole samples.
Defaults values are set and then new records can be inserted. Standards, blanks and duplicates can also be injected at pre-defined intervals.

Editing records
Individual records can be edited, inserted or deleted as necessary as shown in the demo below. Some functions will cause automatic adjustments to the downhole intervals to occur.
Deselect All button
Deselects all currently selected rows.
Insert empty row button
Inserts an empty row with the maximum ID. If a row is selected, an empty row is inserted after the selected row. Note: You cannot select more than two rows.
Insert assay_id button
Updates all rows above the selected row by changing assay_id to -1. Note: You cannot select more than two rows.
Delete assay_id button
Updates all rows above the selected row by changing assay_id to +1. Note: You cannot select more than two rows.
Delete row button
Deletes the selected rows.
Note
Every time a record is changed, a new file will be generated and saved in the directory you set in the configuration tab. Even in the case of a serious mistake, a record of previous actions is saved. As a workaround, you can revert to an earlier state by deleting the latest files from the folder you set as the export path.
see App default working directory for details
Attention
Future version will allow users to go back, and undo their changes.
Sample submissions
The sample submission records have drill holes attached to them. It is configured to match the respective sample batches table in the database. Once the record has been created then it will be sent to both the office (email defined in config) and to the lap (email) defined in the database.
see Office email recipients for details on setting the email addresses.
Warning
To send the samples an internet connection is required !!!

Export csv button
- Downloads the following CSV files to the “Downloads” directory:
sample_batches.csv
assay_lab_jobs.csv
sample_dh_assays.csv
sample_dh_conditions.csv
sample_dh_intervals.csv
sample_dh_recoveries.csv
Attention
The files are generated using the dummy lab job name you set. Once you receive the results from the lab, you must update the correct lab job name in the assay_lab_jobs table. This change will cascade to all related tables.
Add row button
Inserts an empty row with the next available ID.
Edit row button
Allows editing of the currently selected row.
Delete row button
Deletes the selected rows.
Save button
Saves the table data to a file named dhSampleSubmissions.json at the selected path.
Submit button
Submits the registered data to the designated labs and offices. Note: This function is available only when the device is connected to the internet.
Note
One file can be added and will be sent to both the lab and the office.
Attention
Future version will automatically separate sending only sample list to the lab email and the full sample sheet to the office emails.
pXRF Meta
pXRF Meta allows users to set metadata for selected drill hole (DH) sample data. This functionality is part of a multi-step process in the app that integrates drill hole sampling with pXRF metadata assignment.
Prerequisites
Before using the pXRF Meta page, you must:
Initialize lookups in the Config page.
Navigate to the DH Sampling page.
Select the sample data you wish to work with.
Move to the pXRF Meta page.
Note
You must select a BHID on the DH Sampling page before sample data will appear.
Samples marked as standard or blank will be automatically filtered out and not shown on the pXRF Meta page.
Update Metadata
Users can assign or update pXRF meta fields for a range of selected rows based on their No. values.
Input fields are available to define: - Start and End No. for selection. - Metadata fields (e.g., device, operator, date, etc.).
Reading No. Sequence Control
Control the sequence of Reading No. for the selected sample range:
Ascending: Numbers increase from top to bottom.
Descending: Numbers decrease from top to bottom.
Skip Duplicates
When the “Skip duplicates” option is checked: - Any row identified as a duplicate will have its Reading No. set to -1. - This helps exclude duplicate entries from downstream pXRF workflows.
Workflow Summary
Go to DH Sampling and select samples.
Navigate to pXRF Meta.
Verify that only valid samples appear.
Set desired metadata for a row range.
Adjust Reading No. sequence and toggle Skip duplicates as needed.
Apply changes.
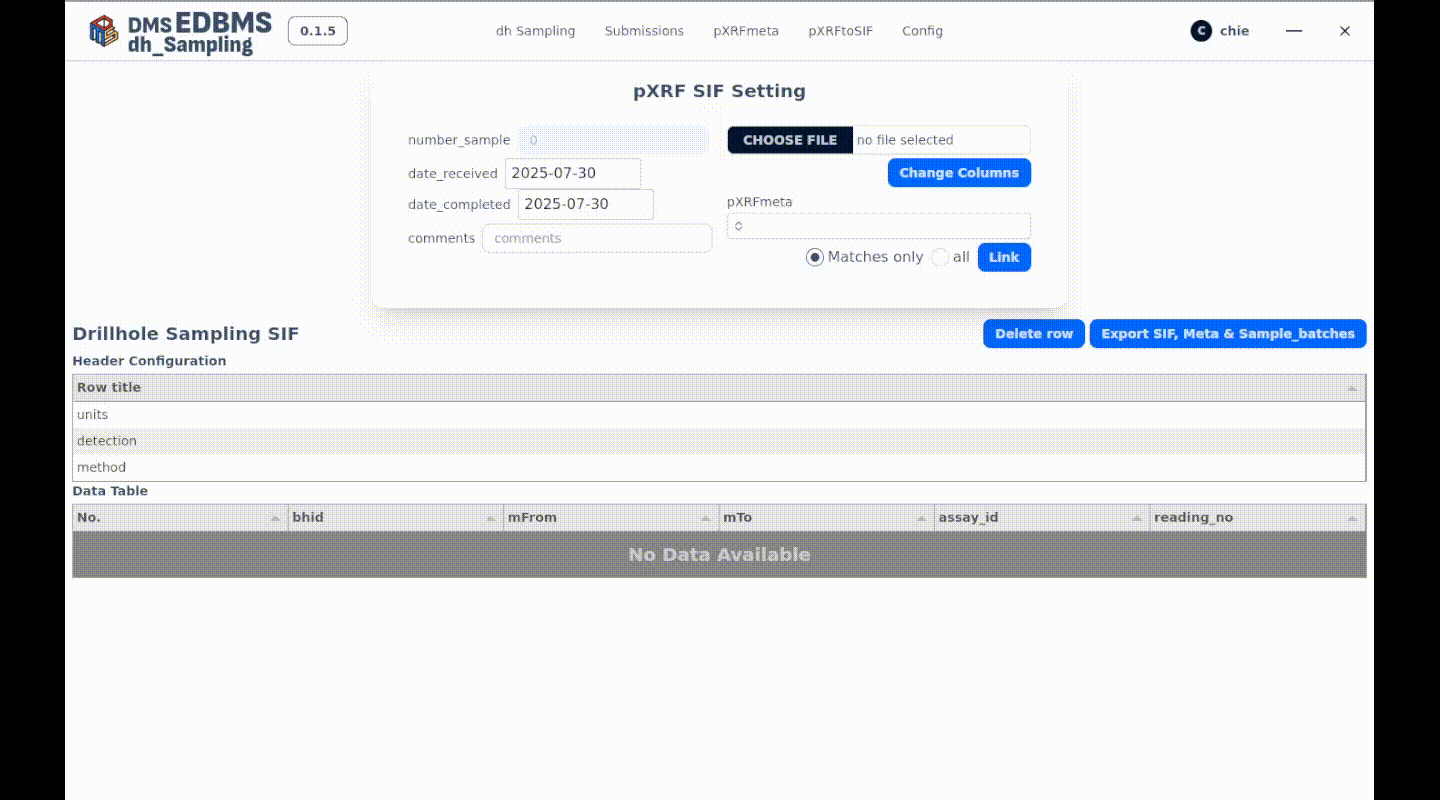
pXRF to SIF
The pXRF SIF page helps you convert pXRF instrument CSV exports into a Standard Import Format (SIF) file for streamlined data upload and reporting. This tool lets you configure column headers, map data fields, and link your export with existing pXRF metadata for accurate integration.
Prerequisites
Go to the Config page and run Initialize Lookups.
Ensure the
lk_pxrf_export_columnstable is populated. These default columns will be shown with a blue highlight during column selection.
Select pXRF File
Upload or select a pXRF CSV file.
A column selector appears:
Default columns from
lk_pxrf_export_columns(blue background) are auto-selected.Additional columns can be picked as needed.
Note
The values for Unit, Detection, and Method will be applied to the Header Configuration Table.
Confirm Columns
After confirming the selected columns:
The Header Configuration Table appears — this is editable.
The Data Table appears below — this is read-only and shown for reference.
The
pXRFSifColumns.jsonis saved under the/pXRFfolder automatically — this is updated whenever you choose a pXRF file, reset defaults, or confirm your selection.The
lk_pxrf_export_columns.csvis saved under the/pXRFfolder automatically — this is a ready-to-load format and updated when the confirm button is clicked.
(Optional) Reset Defaults
Click Reset Default to revert your column selections to the defaults defined in the lookup table.
Note
Each time you select a SIF file or confirm columns, any custom changes—including the pXRF Meta link and Header Configuration Table will be reset.
Data Linking with Metadata
Link to pXRF Meta
Select one of the existing pXRF Meta sessions.
Click the Link button.
This performs a match by Reading No. between:
Selected pXRF Meta entries, and
The currently loaded pXRF CSV file.
You can choose between:
Only matched data: Shows only rows where metadata and CSV both have the same reading number.
All data: Displays the entire CSV file with metadata association where possible.
Exporting the SIF, Meta, & Sample_batches Files
Once the data is prepared:
Click the Export, Meta & Sample_batches button.
This will generate the following files under the Download folder:
SIF_<today>_<timestamp>.csvsample_batches_<today>_<timestamp>.csv: ready to loadsample_batchtableassay_pxrf_meta_<today>_<timestamp>.csv: ready to loadassay_pxrf_metatable
Note
If no pXRF Meta files are linked, the sample_batches and assay_pxrf_meta files will not be downloaded.
Workflow Summary
Select pXRF File
Confirm Columns
Link to pXRF Meta
Export SIF, Meta and sample_batches Files
Release Note
0.1.6 (2025-08-08)
pXRF Meta: A new page to register pXRF meta data is added.
pXRF to SIF: A new page to convert pXRF data to SIF and meta csv files.
0.1.5 (2025-06-09)
Dh sampling: Replaced amount to depth_start, depth_end in the Primary Default.
Dh sampling: Deleted 100 from Standard / Duplicates/ Blank interval options.
Dh sampling: Moved toast message position from bottom right to top center.
Config: Added default Standard / Duplicates/ Blank interval setting.
0.1.4 (2024-11-19)
Removed the “Remember Me” option on the login screen. To log in without re-entering credentials, please close the app using the “X” button in the top-right corner after use.
Integrated CSV functionality into the submission page.
Resolved an issue with duplicate data when generating sample_dh_conditions, sample_dh_intervals, and sample_dh_recoveries.
0.1.3(2024-09-24)
CSV export
Email to Office twice